 |
| 11: Flyer made with Photoshop Skills For this project we created a flyer for a club in our school MCSM. I choose the glee club, using Photoshop tools like the gradient tool and the text tool. I also used the blending tools for the text to make an effect. This flyer was to provide information about the Glee club. |
 |
| 12-Texture with Layer Modes For this project we designed our own piece of clothing using a texture. I used a black dress and a floral type design. I selected the dress to separate it from the figure using the magnetic lasso. Then I put the texture above the dress and used the clipping mask to combine them. Finally I changed the opacity and normal into color dodge. My result was the picture on the left. |
 |
| 13-Change One Thing Poster For this project we took a junk-food (bag of chips)and replaced it with a healthy food (berries) I used the same technique as in project 12 with the magnetic lasso and copy merged. I also used the gradient tool and a solid background to mimic the poster of the Change One Thing campaign |
 |
| 14-Jack-O-Lantern For this project we took a picture of a pumpkin and separated it form the background using the magnetic lasso and the copy merged. then we made a black background and pasted the pumpkin over it. next we made shapes using the pen tool. Then I added the same layer style to each shape created to give it the effect of it having a light inside. Finally I added the text and used the brush tool to make the shadow of the light reflecting out. 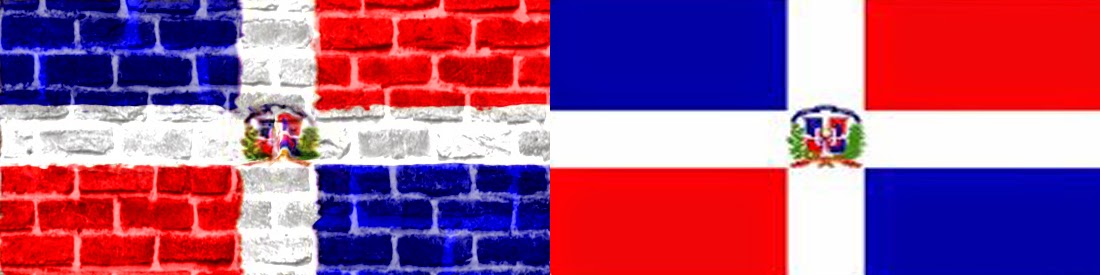 In this project we took a flag and a brick texture to make it seem that the flag was painted on the wall. To make this painted effect we used the displacement maps. The displacement map made the distorted picture have more texture and creating the painted effect. |

For this project we repeated the steps we did for project 15a but instead of a brick wall we used a selfie or a face.
we also added the step of the eraser to make the eyes come out and make it seem that the paint was not over the eyes.
%2Bas%2BSmart%2BObject-1.jpg) |
| 16-Smart Filters For this project we took a picture and made it seem like it was in motion using the filter motion blur. first we open the image a s a smart object. then we applied the filter on the image. next I clicked on the layer palette and erased the area where i didn't want the filter applied. this leading to creating the motorcycle in motion. 
17-Quick Mask
For this project we used the quick mask mode button and used the brush tool to select the area i didn't want changed.
Then we went to select and clicked on inverse for the selected area be the areas we do want changed in this case the hair and pupil. This are turns red because of the quick mask button. finally we applied the change we want in this case i changed the hair color and eye color to purple.
.JPG) For this project i started of with clicking on filter and converting to smart filters. then i clicked on blur and put the Gaussian blur. Next i selected on the screen and used the brush tool and clicked on the airbrush thumbnail. finally i painted over the eyes and hair and any other area that wasn't the skin to give the skin a glow look. These past projects all were in Photoshop. I learned many skills from each project like using smart figure, displacement maps, and quick mask. all these skills helped create different effects like a vehicle moving and the skin glowing. also changing features of my face like my hair and eye color. overall these projects helped me learn new ideas and skills to edit photos. |


