Friday, January 23, 2015
Wednesday, January 7, 2015
3rd marking period
 |
| #23- Gingerbread house for this project we tried to imitate a gingerbread house. |

#24- 3D Gingerbread House
For this project we took our gingerbread house and added a background to it. then we duplicated the layers ad adjusted the blending options to get the 3D effect.
 |
| #25- Glowing Button Animation for this project we created a power button and made it glow. then gave it the animation of it turning on and off. to give it the glow effect we had to make a new group and duplicate it and then change the settings on the power symbol. for the animation i just opened the animation window and duplicated the groups in order to make it seem like it was turning on and off. |
 |
| #26- Showcase of yourself. for this project we made a 3d room with lights to make it seem like a showcase. for the lights and room we used different shapes and layers to make the room seem more realistic as well as the lighting. then we choose pictures of our self and cropped it so it could fit. finally we copied each self portrait and placed it in the room. |
Tuesday, December 16, 2014
3rd Marking Period- Google Sketchup Test
 |
| In thus test i had to make a rectangular block with a semicircle cut in the center. this shape makes ti seem like a ramp. i measured the dimensions of the plan to make my rectangle and then i measure where to start off the semi circle and how high should the loop of the circle be. finally i colored in the different faces of the shape and added the dimensions. |
Friday, December 12, 2014
3rd Marking Period- Google Sketchup
 |
| 22- Block 1 8ft x 5ft x 5ft |
 |
| 22-Block 2 8ft x 5ft x 5ft |
 |
| 22-Block 3 9ft x 4ft x 6ft |
 |
| 22-Block 4 7ft x ft x 4ft |
 |
| 22-Block 5 8ft x 5ft x 5ft |
 |
| 22-Block 6 8ft x 5ft x 6ft |
 |
| 22-Block 7 8ft x 5ft x 6ft |
 |
| 22-Block 8 9ft x 6ft x 5ft |
 |
| 22-Block 9 9ft x 4ft x 6ft |
 |
| 22-Block 10 11ft x 3ft x 6ft |
 |
| 22-Block 11 8ft x 4ft x 6ft |
 |
| 22-Block 12 7ft x 4ft x 6ft For these projects we looked at a plan of the blocks and then we created them ourselves. we first had to find out the dimensions then we measured up to where we wanted to change the original block to give it a different shape. we used the push and pull tool to make sides either pop up or be offset-ted. when we got the shape we wanted we then colored it and showed the dimensions. |
Wednesday, November 26, 2014
2nd Marking Period- Adobe Illusrator
 |
| 19-USB Drive For this project using adobe illustrator i created a flash drive. i used the rectangle tools and the gradient tool. I also used the selection tool to group shapes. Throughout this project we used various tools and effects as rounded corners and making various dilation to the shape and layers. |

20-Cordless phone
For this project i made a cordless phone using illustrator.
we used many tools like the rectangle, eclipse, and rounded rectangle tool. we also used linear gradient and offset paths to give it the different dimensions.
illustrator is different from Photoshop in the sense that you can actually make more realistic things and shapes. also in Photoshop you can edit photos more profoundly meaning you can go into detail on the photo. they are similar because they have similar tools like the gradient tool and the shape tool. with the shape tool in illustrator there are more shapes and you can have different layers by setting the offset path to negative. in Photoshop its more a two-dimensional figure while in illustrator you can change the dimensions. i find Photoshop easier to work with because of its simplicity but illustrator is more realistic in the sense you want to create an actual image.
Tuesday, October 21, 2014
2nd Marking Period- Publisher
 |
| 11: Flyer made with Photoshop Skills For this project we created a flyer for a club in our school MCSM. I choose the glee club, using Photoshop tools like the gradient tool and the text tool. I also used the blending tools for the text to make an effect. This flyer was to provide information about the Glee club. |
 |
| 12-Texture with Layer Modes For this project we designed our own piece of clothing using a texture. I used a black dress and a floral type design. I selected the dress to separate it from the figure using the magnetic lasso. Then I put the texture above the dress and used the clipping mask to combine them. Finally I changed the opacity and normal into color dodge. My result was the picture on the left. |
 |
| 13-Change One Thing Poster For this project we took a junk-food (bag of chips)and replaced it with a healthy food (berries) I used the same technique as in project 12 with the magnetic lasso and copy merged. I also used the gradient tool and a solid background to mimic the poster of the Change One Thing campaign |
 |
| 14-Jack-O-Lantern For this project we took a picture of a pumpkin and separated it form the background using the magnetic lasso and the copy merged. then we made a black background and pasted the pumpkin over it. next we made shapes using the pen tool. Then I added the same layer style to each shape created to give it the effect of it having a light inside. Finally I added the text and used the brush tool to make the shadow of the light reflecting out. 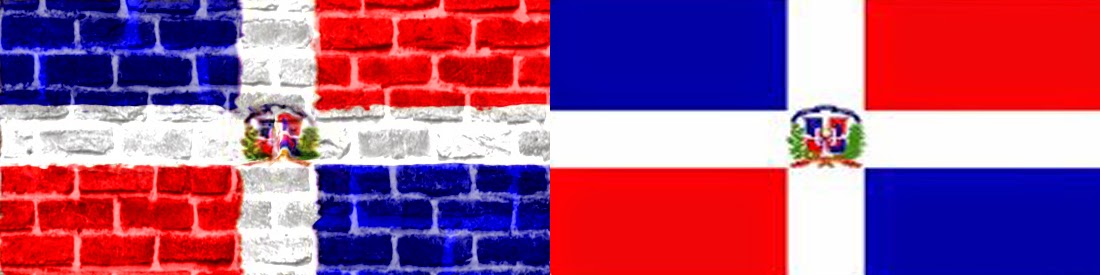 In this project we took a flag and a brick texture to make it seem that the flag was painted on the wall. To make this painted effect we used the displacement maps. The displacement map made the distorted picture have more texture and creating the painted effect. |

For this project we repeated the steps we did for project 15a but instead of a brick wall we used a selfie or a face.
we also added the step of the eraser to make the eyes come out and make it seem that the paint was not over the eyes.
%2Bas%2BSmart%2BObject-1.jpg) |
| 16-Smart Filters For this project we took a picture and made it seem like it was in motion using the filter motion blur. first we open the image a s a smart object. then we applied the filter on the image. next I clicked on the layer palette and erased the area where i didn't want the filter applied. this leading to creating the motorcycle in motion. 
17-Quick Mask
For this project we used the quick mask mode button and used the brush tool to select the area i didn't want changed.
Then we went to select and clicked on inverse for the selected area be the areas we do want changed in this case the hair and pupil. This are turns red because of the quick mask button. finally we applied the change we want in this case i changed the hair color and eye color to purple.
.JPG) For this project i started of with clicking on filter and converting to smart filters. then i clicked on blur and put the Gaussian blur. Next i selected on the screen and used the brush tool and clicked on the airbrush thumbnail. finally i painted over the eyes and hair and any other area that wasn't the skin to give the skin a glow look. These past projects all were in Photoshop. I learned many skills from each project like using smart figure, displacement maps, and quick mask. all these skills helped create different effects like a vehicle moving and the skin glowing. also changing features of my face like my hair and eye color. overall these projects helped me learn new ideas and skills to edit photos. |
Thursday, October 16, 2014


Subscribe to:
Comments (Atom)